This post is part of our series on functions in R. You can see our previous post if you want to understand the basics but it is not strictly necessary. Here we will go into detail about for loops and if statements in R, two key elements of any function. We are going to define a process, map it in a step-by-step approach and wrape it in a function that can repeat it automatically. Even if you have a very basic understanding of R you should be able to follow this tutorial without problem.
Our outcome will be an R function that by calling it, is able to fill in empty rows generated from imported sheets (like excel) when it contains merged cells. If you are only interested in the function itself you can go to the end of the post and find it in the section Final remarks.
Description of the problem
In our previous post we saw the basics for creating functions, yet using silly examples with not much of practical usage. Now we are ready to write a function that can have more practical use.
There are different ways how to import data sheets (i.e. from excel) to R. Regardless of its limitations, these sheets are widely used in data analysis today. If you are used to do data analysis with a different software you should be familiar with the complications of sorting your data imported from sheets when there are merged cells in the rows. Usually, a file like below
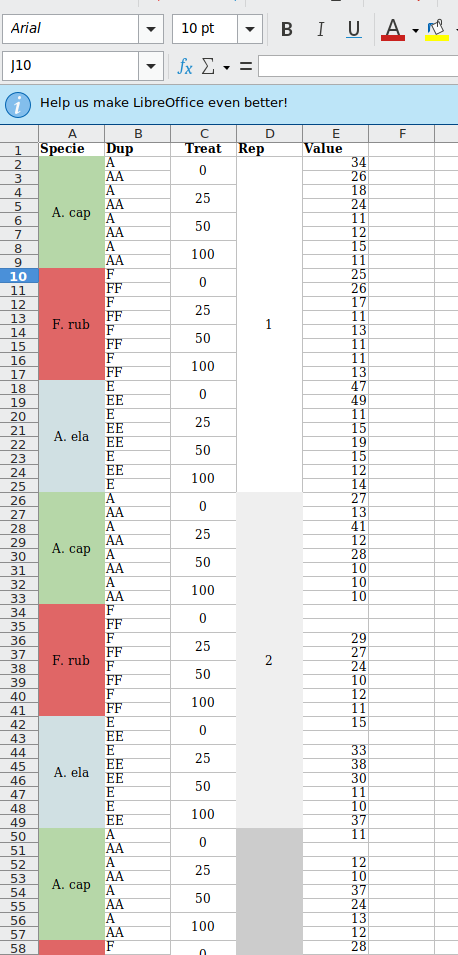
results in a table like this
| Specie | Dup | Treat | Rep | Value |
|---|---|---|---|---|
| A. cap | A | 0 | 1 | 34 |
| AA | NA | NA | 26 | |
| A | 25 | NA | 18 | |
| AA | NA | NA | 24 | |
| A | 50 | NA | 11 | |
| AA | NA | NA | 12 | |
| A | 100 | NA | 15 | |
| AA | NA | NA | 11 | |
| F. rub | F | 0 | NA | 25 |
| FF | NA | NA | 26 | |
| F | 25 | NA | 17 | |
| FF | NA | NA | 11 | |
| F | 50 | NA | 13 | |
| FF | NA | NA | 11 | |
| F | 100 | NA | 11 |
when the amount of rows to be filled in is small, there’s no big problem in copying and pasting the values. But as the DRY principle says, if we know how to create functions there is no need to do that, we can make a function that will do it automatically. This will specially pay off when you will have a table with hundreds or even thousands of cells merged. You might be thinking that nobody will merge cells for thousands of rows every 3 or 4 lines, but believe me, I have seen such things.
Keep in mind that this is mainly a tutorial for writting functions in R. It does not intend to deal with all the issues that migh appear with the importing of data such as merged columns or a mixture of both, among others. But if you have problems with that or are interested in the topic, leave us a comment and we can cover some points in a future post.
R function to fill in merged cells from excel
With today’s technology there are many ways to solve this problem. However sometimes the easiest way to import data to R as data analyst or statistician is by simply taking the working sheet containing the data and exporting it in csv format.
Regardless of the source (excel, libre office, google sheets, etc.) this method produces empty rows by default. When some rows have been merged because they belong to the same group or factor, the csv file will capture the value only on the first row and leave the rest empty until the next factor appear, where it again, will capture the value on the first row and leave the rest empty until the next factor appears. The process continues like this, iteratively until the end of the table. We basically need to copy the value stored on that first row and paste it to the empty rows, until a new factor appears.
Let’s map the process in terms of R steps to complete our task.
Maping the process
We will start by calling the table. If you have an excel, libre office calc or google sheet file with merged rows as our example above feel free to use it. Otherwise you can quickly simulate one similar to the image above. Start by exporting the sheet of interest to csv, then we call it using read.csv
my.table <- read.csv('../../../static/post/2021/fill_merged_cells/Hydroponic_results.csv')
head(my.table, n = 10)
>    Specie Dup Treat Rep Value
> 1  A. cap   A     0   1    34
> 2          AA    NA  NA    26
> 3           A    25  NA    18
> 4          AA    NA  NA    24
> 5           A    50  NA    11
> 6          AA    NA  NA    12
> 7           A   100  NA    15
> 8          AA    NA  NA    11
> 9  F. rub   F     0  NA    25
> 10         FF    NA  NA    26
Here we can see the first 10 rows containing NA for numeric columns and empty string for character columns. Now let’s go step by step to fill empty values.
1. Identify and capture the factor
Let’s start with the first column Specie (an experiment was run for 3 different species of plants). We want to check if the first row contains a categorical value
no.row <- 1
my.table[['Specie']][no.row]
> [1] "A. cap"
2. Copy it into the empty rows
Now we want to paste the value stored in category to all empty rows. So we first need to check if the next row is empty
no.row <- 2
my.table[['Specie']][no.row]
> [1] ""
And when it is, we place the value contained in the previous row to our current row 2
my.table[['Specie']][no.row] <- my.table[['Specie']][no.row-1]
head(my.table)
>   Specie Dup Treat Rep Value
> 1 A. cap   A     0   1    34
> 2 A. cap  AA    NA  NA    26
> 3          A    25  NA    18
> 4         AA    NA  NA    24
> 5          A    50  NA    11
> 6         AA    NA  NA    12
Now row 2 contains it’s categorical value, and when we move to row 3 (which is also empty), it can be copied from the previous row 2
no.row <- 3
my.table[['Specie']][no.row]
> [1] ""
my.table[['Specie']][no.row] <- my.table[['Specie']][no.row-1]
head(my.table)
>   Specie Dup Treat Rep Value
> 1 A. cap   A     0   1    34
> 2 A. cap  AA    NA  NA    26
> 3 A. cap   A    25  NA    18
> 4         AA    NA  NA    24
> 5          A    50  NA    11
> 6         AA    NA  NA    12
3. When a new factor appears, repeat the process
We can repeat this process until a new factor appears, as it is the case of row 9. Therefore we should not paste anything in row 9, and continue the process on row 10 which is also empty
no.row <- 10
my.table[['Specie']][no.row]
> [1] ""
my.table[['Specie']][no.row] <- my.table[['Specie']][no.row-1]
head(my.table, n = 10)
>    Specie Dup Treat Rep Value
> 1  A. cap   A     0   1    34
> 2  A. cap  AA    NA  NA    26
> 3  A. cap   A    25  NA    18
> 4          AA    NA  NA    24
> 5           A    50  NA    11
> 6          AA    NA  NA    12
> 7           A   100  NA    15
> 8          AA    NA  NA    11
> 9  F. rub   F     0  NA    25
> 10 F. rub  FF    NA  NA    26
4. Repeat steps 1-3 for each column that needs it
The process moves forward in this way until the whole column Specie is filled in. Then we can move to the next column with empty values, in my case this is Treat.
If you look at the process, we basically need to write an R command for step 2. The rest is just a process of verification and repetition. We are going to automate verification using the function if() and the repetition using for().
Writing my first for loop
Since the present post is directed to R beginners with not much experience with programming or coding I will avoid all the technicalities of for loops and if statements and instead dive deeply into them by applying our logic above. Then we are going to use them and explain carefully to obtain a pragmatic understanding of the process.
We will start with a for loop to go row by row in one column and check what is inside, as described in the step 1 of our process. Let’s start with only 20 rows as an example
for(no.row in 1:20){
    print(my.table[["Specie"]][no.row])
}
> [1] "A. cap"
> [1] "A. cap"
> [1] "A. cap"
> [1] ""
> [1] ""
> [1] ""
> [1] ""
> [1] ""
> [1] "F. rub"
> [1] "F. rub"
> [1] ""
> [1] ""
> [1] ""
> [1] ""
> [1] ""
> [1] ""
> [1] "A. ela"
> [1] ""
> [1] ""
> [1] ""
The function for()uses the first argument that you define (here no.row) and goes one by one in the series specified as the second argument, in this case a series of numbers from 1 to 20 (1:20). It means that in the first iteration no.row will take the value 1, in the second iteration the value 2, and so on, until the last iteration where it will have the value 20. Each iteration will execute the code inside the curly braces {} which, in this case, is simply to print the value of each row.
Because the first argument in for() is defined by us, we could as well use any arbitrary argument we want, for example
for(n in 1:20){
    print(my.table[["Specie"]][n])
}
would do exactly the same but now n is taking the values from 1 to 20.
We can then initialize a function that takes the name of our data frame, the name of the column, and do exactly the same as our code above, but for all the rows contained in the table, no matter how many they are
fill_merged <- function(dat, column){
    ## Get value of each row
    for(n in 1:nrow(dat)){
        print(my.table[[column]][n])
        }
}
Here our for loop will create a local variable n that will take values from 1 until nrow(dat) which means number of rows in the table dat, and then print each row value contained in the column stated in the argument column. If we apply it to our data frame
fill_merged(my.table, "Specie")
The R console will print, one by one, each of the values contained in the column Specie (I have 120 rows, it makes no sense to take space to show it in the post, but you can go ahead and try it yourself).
If the last two pieces of code are not clear for you, I recommend you to read our previous post about functions in R.
How to use If statement in R
Printing the values is far from what we want to achieve. As we defined in the first step of the process, we need to check the value inside, if it has a value we leave it alone, but if it is empty, we fill it in with the previous value. To check if the value is empty or not we use the if() function
fill_merged <- function(dat, column){
    ## Get value of each row
    for(n in 1:nrow(dat)){
        ## Check if it is empty
        if(dat[[column]][n] == ''){
            dat[[column]][n] <- dat[[column]][n - 1]
        }
    }
    return(dat)
}
The function if() checks the expression inside parentheses and if it returns TRUE it executes the code inside curly braces {}, otherwise it will skip it. Therefore it is crucial that the expression inside if() returns either TRUE or FALSE. You can always test it by sending the exact expression directly to the console
my.table[['Specie']][1] == ''
> [1] FALSE
my.table[['Specie']][5] == ''
> [1] TRUE
Once we confirm that the value is empty, we enter the if statement and execute the code from step 2, which inside the function takes the form of dat[[column]][n] <- dat[[column]][n - 1].If the value is not empty, we simply do nothing.
Now we can actually try the function in one of our columns
my.filled.table <- fill_merged(my.table, 'Specie')
head(my.filled.table, n = 15)
>    Specie Dup Treat Rep Value
> 1  A. cap   A     0   1    34
> 2  A. cap  AA    NA  NA    26
> 3  A. cap   A    25  NA    18
> 4  A. cap  AA    NA  NA    24
> 5  A. cap   A    50  NA    11
> 6  A. cap  AA    NA  NA    12
> 7  A. cap   A   100  NA    15
> 8  A. cap  AA    NA  NA    11
> 9  F. rub   F     0  NA    25
> 10 F. rub  FF    NA  NA    26
> 11 F. rub   F    25  NA    17
> 12 F. rub  FF    NA  NA    11
> 13 F. rub   F    50  NA    13
> 14 F. rub  FF    NA  NA    11
> 15 F. rub   F   100  NA    11
Note that so far it works only for columns with character values, not numeric
fill_merged(my.table, 'Treat')
> Error in if (dat[[column]][n] == "") {: missing value where TRUE/FALSE needed
The reason is that only character columns produce empty strings. Numeric columns will produce NA values. Therefore, we need to add a condition to our if expression to test also if the value is NA. To do that we use double | which in R means OR
fill_merged <- function(dat, column){
    ## Get value of each row
    for(n in 1:nrow(dat)){
        ## Check if it is empty
        if(dat[[column]][n] == '' || is.na(dat[[column]][n])){
            dat[[column]][n] <- dat[[column]][n - 1]
        }
    }
    return(dat)
}
Now our if statement is telling to R “IF the value is empty ('') OR is NA (is.na()) then, execute this code”, and so we enter to the code inside the if-curly-braces.
NA are not exactly values and therefore we cannot test them by using the expression
my.table[['Treat']][2] == NA
> [1] NA
Instead of returning TRUE or FALSE returns NA which means Not Available. To check if the value is NA or really a value we use the function is.na()
is.na(my.table[['Treat']][2])
> [1] TRUE
Now we can use our function for columns with numeric values also
my.filled.table <- fill_merged(my.table, 'Treat')
head(my.filled.table, n = 10)
>    Specie Dup Treat Rep Value
> 1  A. cap   A     0   1    34
> 2  A. cap  AA     0  NA    26
> 3  A. cap   A    25  NA    18
> 4          AA    25  NA    24
> 5           A    50  NA    11
> 6          AA    50  NA    12
> 7           A   100  NA    15
> 8          AA   100  NA    11
> 9  F. rub   F     0  NA    25
> 10 F. rub  FF     0  NA    26
Check, confirm and repeat (for and if together)
Now we could use our function for each column that presents this issue, but we are actually trying to apply the DRY principle. Instead we could use for() to go through all the columns where we want to apply it. There are other functions that can help with this as well such as map() and its derived functions from the package purrr.We could also write a new function that calls our first function to repeat it into each column. Feel free to experiment, for this tutorial we are going to take a different approach.
We are going to improve the same old function and add yet one more for loop that iterates from each column of interest and repeats the same process. This will cover the step 4 of our mapped process.
The implementation is actually easy, we just need to wrap the whole previous process of if’s and for’s inside a for loop that goes column by column
fill_merged <- function(dat, columns.as.vector){
    ## Go through the columns
    for(column in columns.as.vector){
        ## Get value of each row
        for(n in 1:nrow(dat)){
            ## Check if it is empty
            if(dat[[column]][n] == '' || is.na(dat[[column]][n])){
                dat[[column]][n] <- dat[[column]][n - 1]
            }
        }
    }
    return(dat)
}
I have changed the argument for initiating the function from column to columns.as.vector. Now this will take a vector containing all the names of the columns that should be treated. Notice that in our new for loop I am declaring column to iterate over each value of column.as.vector therefore, the variable column will contain each string in the vector for each iteration. In this way we don’t need to change the rest of the code.
Now you can call exactly the same function for each column that needs it
target_cols <- names(my.table)[c(1,3,4)]
my.filled.table <- fill_merged(my.table, target_cols)
head(my.filled.table, n = 15)
>    Specie Dup Treat Rep Value
> 1  A. cap   A     0   1    34
> 2  A. cap  AA     0   1    26
> 3  A. cap   A    25   1    18
> 4  A. cap  AA    25   1    24
> 5  A. cap   A    50   1    11
> 6  A. cap  AA    50   1    12
> 7  A. cap   A   100   1    15
> 8  A. cap  AA   100   1    11
> 9  F. rub   F     0   1    25
> 10 F. rub  FF     0   1    26
> 11 F. rub   F    25   1    17
> 12 F. rub  FF    25   1    11
> 13 F. rub   F    50   1    13
> 14 F. rub  FF    50   1    11
> 15 F. rub   F   100   1    11
Also notice the trick in the first line: names(my.table) returns a vector containing all the column names of the data frame and names(my.table)[c(1,3,4)] is taking only the columns 1, 3 and 4, which are the ones that need to be fixed. This is extremely useful when you have many columns that need to be fixed
Marking the errors
You might have noticed that I’m adding text preceded by ## within the function. If you are not familiar with it, this are comments, it means that anything that is written in the same line after one # will not be evaluated by R (I use double for technical reasons of my text editor). Although this function is quite small and simple, and we know what exactly we are doing on each line thanks to the explanations, it is a good practice to add comments to your code because after a while, when you will look back at the code you might had forgotten the logic and structure. Adding comments help us to know what each piece is about, making it easier to apply changes in the future.
In the same way, it is a good practice to add errors when the function is expecting something in particular and we can foresee potential problems. Often we don’t foresee all the mistakes and problems that the user or we ourselves can have when using our own functions and thus, errors are usually added along the way based on the experience gathered by using the function.
For example, our function is expecting that at least the first row will not have empty values, otherwise it cannot go one row before to find the value to paste on it. Although it is not expected, our table can still present this situation due to human errors, for example, somebody by accident pressed Delete button somewhere on the first row in the source file. In such case R will mark some error that will be difficult to understand and track back. We might wonder for hours what we did wrong in our function only to find out that the problem comes from the data table itself. Instead we can mark our own error in advance by sending a message when the value on the first row is missing.
An easy way of implementing this is using the function stop(). Let’s implement our error into our function right before it copies the value from the row n - 1.
fill_merged <- function(dat, columns.as.vector){
    ## Go through the columns
    for(column in columns.as.vector){
        ## Get value of each row
        for(n in 1:nrow(dat)){
            ## Check if it is empty
            if(dat[[column]][n] == '' || is.na(dat[[column]][n])){
                ## If it is the row 1, stop with Error
                if(n == 1){
                    stop(paste0("Row 1 of column ", column,
                                    " has empty values. Check your data."))
                }
                else{
                    dat[[column]][n] <- dat[[column]][n - 1]
                }
            }
        }
    }
    return(dat)
}
If the value of the first row is empty, the function will stop, printing a message that says in which column the row no. 1 is empty. When the row is not the first, R will evaluate the code next, contained inside else{}. else is a complement for if that tell R what to do when the if() part is not fulfilled. Sometimes we can omit it, when the if() part is not fulfilled R will simply go to the next part of the code. But when we want to make sure that nothing will happen outside these options, we include else. Here we are giving only two options, either n equals 1 and the function stops with an error, or else n is not one and the function continues.
Let’s try the error by making a copy of our data frame with the first row empty
test.error <- my.table[2:10,]
fill_merged(test.error, 'Rep')
> Error in fill_merged(test.error, "Rep"): Row 1 of column Rep has empty values. Check your data.
Another misunderstanding that the user can encounter is with the argument columns.as.vector. We are expecting that the user will provide a string, or vector of strings with the names of the columns, but the user as well might think that the function is expecting the whole data as vector. We can prevent the user for doing this by adding an error at the beginning of the function.
fill_merged <- function(dat, columns.as.vector){
    ## Check if column names are provided as strings
    if(!is.character(columns.as.vector)){
        stop("Column names must be provided as string or vector of strings of class character")
    }
    ## Go through the columns
    for(column in columns.as.vector){
        ## Get value of each row
        for(n in 1:nrow(dat)){
            ## Check if it is empty
            if(dat[[column]][n] == '' || is.na(dat[[column]][n])){
                ## If it is the row 1, stop with Error
                if(n == 1){
                    stop(paste0("Row 1 of column ", column,
                                    " has empty values. Check your data."))
                }
                else{
                    dat[[column]][n] <- dat[[column]][n - 1]
                }
            }
        }
    }
    return(dat)
}
We want to make sure that columns.as.vector is character. To test this, we use the function is.character(), which will return TRUE when the values inside are character, and FALSE otherwise.
a <- 'foo'
is.character(a)
> [1] TRUE
However we want to send the error only when the value is NOT character. To tell R to test the opposite, we start the argument with the symbol !
!is.character(a)
> [1] FALSE
Now with our new version, when the user might provide any value that is not string, the error will be triggered
fill_merged(my.table, 1)
> Error in fill_merged(my.table, 1): Column names must be provided as string or vector of strings of class character
Still if the user provides a vector of strings, or a misspelled name of the column, our function is not aware of it. We can add one more error when column.as.vector is string but not a string that we are expecting
fill_merged <- function(dat, columns.as.vector){
    ## Check if column names are provided as strings
    if(!is.character(columns.as.vector)){
        stop("Column names must be provided as string or vector of strings of class character")
    }
    ## Go through the columns
    for(column in columns.as.vector){
        ## Check if the column name matches with dat column names
        if (!column %in% names(dat)){
            stop(paste0('Column <', column, '> cannot be found in the data frame'))
        }
        ## Get value of each row
        for(n in 1:nrow(dat)){
            ## Check if it is empty
            if(dat[[column]][n] == '' || is.na(dat[[column]][n])){
                ## If it is the row 1, stop with Error
                if(n == 1){
                    stop(paste0("Row 1 of column <", column,
                                    "> has empty values. Check your data."))
                }
                else{
                    dat[[column]][n] <- dat[[column]][n - 1]
                }
            }
        }
    }
    return(dat)
}
Here we are implementing if (!column %in% names(dat)). Again we are using ! to tell R to test the opposite. column %in% names(dat) will take the value of column and check if it is present in the vector names(dat) (which has the names of the columns).
Let’s test the last error by misspelling the name of one column
fill_merged(my.table, c('Specie', 'Treatment'))
> Error in fill_merged(my.table, c("Specie", "Treatment")): Column <Treatment> cannot be found in the data frame
If you can think of more errors feel free to add them, it will be good for you as a practice. However you should also try and see what happens with other potential scenarios before adding the errors yourself. Sometimes the default errors from other functions are enough to solve problems. For example, try providing to our function a data frame that does not exist, R will immediately tell you object 'x' not found.
Final remarks
I hope that the post has helped you to have a better understanding of for() and if(), and provided you with a good guidance on how you can plan and structure functions. If something was not clear or you still have questions, or something in your code did not work as expected, feel welcome to leave us a comment below (you will need a github account for that).
There are many ways how you can call your function now to your future projects. One of the easiest for now would be to save it in an R script, for example fill_merged_cells.R and then you can call it from any script or R code by providing the path to your script to the function source()
source('~/Rscripts/fill_merged_cells.R')
changing the path to the exact location of your file. Source will run all the code contained inside the .R file in the R session where you call it, making your function available for the current session.
Here is the final form of the function for filling in empty rows produced by merged cells. I hope it will help with your work. Enjoy it!
fill_merged <- function(dat, columns.as.vector){
    ## Check if column names are provided as strings
    if(!is.character(columns.as.vector)){
        stop("Column names must be provided as string or vector of strings of class character")
    }
    ## Go through the columns
    for(column in columns.as.vector){
        ## Check if the column name matches with dat column names
        if (!column %in% names(dat)){
            stop(paste0('Column <', column, '> cannot be found in the data frame'))
        }
        ## Get value of each row
        for(n in 1:nrow(dat)){
            ## Check if it is empty
            if(dat[[column]][n] == '' || is.na(dat[[column]][n])){
                ## If it is the row 1, stop with Error
                if(n == 1){
                    stop(paste0("Row 1 of column <", column,
                                    "> has empty values. Check your data."))
                }
                else{
                    dat[[column]][n] <- dat[[column]][n - 1]
                }
            }
        }
    }
    return(dat)
}